Obelisk Bookmarks: a Valentine DIY Project with Parvum Opus
- Erika Stefanutti
- Feb 4, 2024
- 4 min read
Over the years, many of you have asked me for advice about crafting with paper. Here's a little project that, with not much time or effort, will yield something special. Enjoy!
Just for fun: The March of the Obelisk Bookmarks
Long before I founded Parvum Opus, I was already in the habit of keeping baskets full of small scraps of beautiful patterned papers left over from gift wrap, antique ephemera, etc. Many of these scraps were crafted into colorful bookmarks: these are always in short supply at our house, where we all have the same habit of reading many books at once... As I'm sure you can imagine, my scrap paper collection has grown exponentially given all of the projects produced in the Parvum Opus studio! Perhaps you have a similar stash of colorful bits and pieces? Today I thought I'd show you how to make a nice paper obelisk bookmark, just in time to tuck into a card or book for your Valentine.


For each bookmark, you'll need:
Thick cardstock or heavy watercolor paper, about 3" x 9"
Two decorative paper scraps, measuring about 3" x 10" each
PVA white glue and a natural bristle brush for applying it
Helpful tools:
A small utility knife with snap-off blades
A metal straight edge ruler
A self-healing cutting mat
A teflon bone folder (useful but not necessary)
Plain newsprint or other scrap paper
Waxed paper or nonstick parchment baking paper
A heavy book to press your finished bookmark
It's certainly not complicated to draw an obelisk shape of your own proportions, but just in case you'd like a printable template, I've created one for you: the download includes a template for the cardstock obelisk, as well as templates for cutting out the decorative paper for the front and back of the bookmark.

Step 1: Prepare your templates
To begin, cut out the three templates: one is for the body of the bookmark, one is for the decorative paper that will cover the front and edges, and the last is for the paper lining on the back. Unless you've printed this onto thick cardstock, you'll have to trace these three obelisk shapes onto thick paper and cut those new pieces out. I've used 140# watercolor paper, but recycled heavy postcards would be great, too.

Step 2: Cut out the three parts for your bookmark
Trace the obelisk template (A) onto thick paper: this will be the foundation for your bookmark. Trace the largest template (B) onto the reverse side of your decorative paper: this will be the section of the pattern that will appear on the front of your bookmark. Trace the smallest template (C) onto the reverse of another piece of decorative paper: this will be the lining for the back side of your bookmark. Cut these pieces out: I like to use a utility knife for this, but scissors work, too.
Step 3: Glue the obelisk bookmark onto the backside of your decorative paper
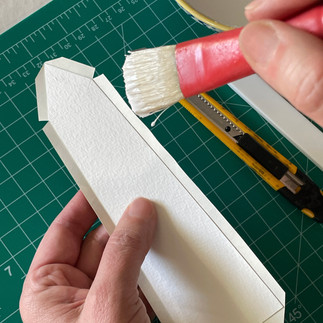
Using a brush, apply a thin coat of PVA white glue to one side of your thick paper bookmark. Center the bookmark onto the reverse of your decorative paper: you should have a border of about 1/4" all around. Carefully press the papers together to ensure there are no bubbles, excess glue or wrinkles. If you aren't using a teflon folder, you can simply put your bookmark between a couple of sheets of waxed paper and leave it under a heavy book while the glue dries.

Step 4: Make miter cuts and glue the flaps down
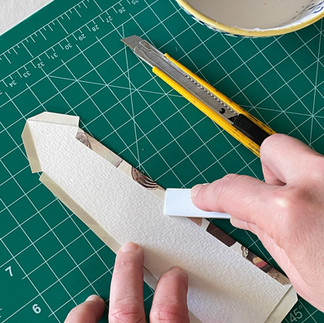
Once the paper is well-adhered to your bookmark, make mitering cuts as shown below, and fold the decorative paper flaps over each side, creasing them along the edge of the thick paper bookmark body. Using a brush, apply a bit of glue to the flaps and glue into place.
Step 5: Glue the backing paper onto your bookmark & press.
Place your backing paper face down on a piece of scrap paper or newsprint. Starting at the center, apply a thin coat of glue, brushing out towards the edges. The paper will begin to curl, but just keep the very tip of one or two fingers on it until the paper relaxes- this takes a few seconds. At this point, carefully lift the backing piece and set it into place on the back of the bookmark. Use your fingers or teflon folder to press the paper down, ensuring all the edges are adhered. Now you can place the bookmark between waxed paper sheets and place it under the heavy book while the glue dries.

After just a short while, your obelisk bookmark will be perfectly flat and ready to tuck into a card for your special Valentine. Have fun!

Souvenir is the blog for Parvum Opus, an artist-run studio specializing in artistic decorative objects and home furnishings. We welcome your thoughts! Comment below to join the conversation, and if you enjoyed this, don't forget to subscribe to receive an email when we publish new posts.


